| Return
Home
Return to
Main
How-To
Page
If you would
like to make
a donation to
help fund
this site,
click below!
|
How to Remove the TL-DTL Top Plate
The service procedure described here for basic top- and
bottom-plate disassembly is equally applicable to all Mamiya 500- and
1000-TL and DTL cameras. Please read carefully in its entirety before
proceeding to disassemble your camera. We cannot be responsible for
damages you might incur by working on your own equipment.
Begin Disassembly by unscrewing the left-hand thread (clockwise
is off) rewind button on the bottom of the camera. Next, take out the
four bottom cover-retaining screws and lift off the bottom cover. If the
S-76 battery is still in place, remove it from the camera.

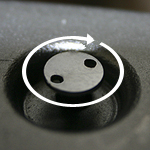
Figure 1 - BOTTOM OF CAMERA
Figure 1 shows the bottom of the camera body with the bottom plate
removed. Note the wind lever axis and the wind lever return spring, which
hooks to the left side of the lug on the wind lever shaft, and to the
right side of the diaphragm-meter switch link. The meter shutoff button
shaft and lever pass through the middle of the wind lever shaft. One end
of the meter shutoff button shaft lever rests against the diaphragm-meter
switch link, and the other end hooks to a flat, tension-type spring, which
itself hooks to a stud screw in the camera body.
Pull the wind lever away from the camera body, and
watch the shutoff-button lever fall between the wind lever shaft lug and
the diaphragm-meter switch link. Push the wind lever back against the
camera body, and note that the diaphragm-meter switch link is pushed across
the camera body, closing the contact on the battery-holder for the exposure
meter. At the same time, the diaphragm striker plate is pushed forward
inside of the mirror cage to stop-down the diaphragm of the lens.
A common problem with this camera series is the exposure meter
switch. Always check the battery and then the switch in the bottom of
the camera when you have a meter problem. Many times the tab on the battery
holder will break off, preventing the switch link from making contact.
Some of the newer models of the series (later in the production cycle)
have a spring tab on the end of the switch link, to ease the pressure
on the battery holder itself. Models after 1973 have a switch near the
wind shaft, which was meant to eliminate the meter switch problems.
The Mamiya-Sekor TL-series provides both X and FP synch via twin
contacts. The FP contact is closed via the opening curtain latch, which
is tripped by a linkage on the mirror cage approximately 7- to 15-milliseconds
before the curtain clears the opening side of the film plane. The X contact
is closed via a cam and insulated stud on the bottom of the opening curtain
drum. The contact is closed only as soon as the opening curtain complets
its travel across the film plane.
Note that the FP contact is closed only as long as the mirror is
in the "up" position. The X contact is closed when the shutter is tripped.
Thus, the FP contact acts as a safety switch, allowing continuity in the
sync circuit only while the shutter and mirror are in operation during
an exposure. Failure of the FP contact will also render the x sync circuit
inoperative. So handle with care, as the sync contacts bend easily.
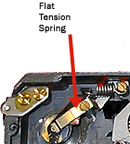 Figure
1a - FLAT TENSION SPRING Figure
1a - FLAT TENSION SPRING
To continue disassembly, remove the flat tension
spring (Figure 1a) from the bottom of the meter shutoff button shaft and
lever. This spring provides the upward pressure on the shutoff button
shaft, and allows the shutoff button lever to drop between the wind lever
lug and the diaphragm-meter switch link when the wind lever is pulled
away from the camera body.

Figure 2 - TOP OF CAMERA BODY
Carefully pull the meter shut-off button shaft
and lever out of the camera body approximately 1/4-inch. This will allow
the meter shutoff button to drop free from the top of the wind lever.
Push the meter shutoff button shaft back into the camera body, and reconnect
its spring (if it becomes disconnected during this procedure).
On the under side of the meter shutoff button you will find an
access hole. There are repair descriptions (and even repair facilities)
that will try to short-cut this step, but they inevitably damage the top
of the wind lever, the meter shutoff button, and the camera's top plate,
all because they are too lazy to remove the bottom cover and do this right!
Loosen the set-screw in the wind lever cap and unscrew the left-hand threaded
(right is off) wind cap.
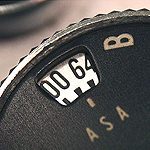
Set the shutter speed dial to 1/4 second, and the ASA (ISO) to
80. Loosen the set screws now visible on the rear of the shutter speed
dial. Reset the ASA to the highest setting, and speed dial to Bulb (B).
Lift off the shutter speed dial. Removing the dial in this position allows
most of the tension to be released from the exposure meter spring, and
prevents meter backlash when the dial is removed.
Wedge the rewind fork with a small screwdriver, and unscrew the
rewind knob. Remove the three screws from the top cover plate -- one at
each end and one under the speed dial. Lift off the top cover and the
washers from the top of the counter and shutter release button. Using
a pair of delicate pliers, carefully unhook the prism hold-down spring.
Lift off the plastic cover, prism and prism seat shim (this shim is not
found on all Mamiya TL- and DTL-series cameras). Remove the two screws
in the lens mount apron and lift it off.
You have now completed the basic disassembly of the top and bottom plates.
Figure 2 shows how the top of the camera body looks at this point (a better
picture will be provided soon).
When re-installing the speed dial after your work is done, simply
set the shutter speed to Bulb (B), and rotate the chain coupler all the
way counter-clockwise. Set the speed dial to ASA 800 (or the highest ASA),
and set the dial back on the camera body with the Bulb position to the
rear of the body. Rotate the speed dial counter-clockwise, and pick up
the chain coupler. Finally, seat the speed dial in the Bulb position.
Make certain the set-screw is very tight, or the speed dial will come
off as soon as you try to reset the ASA!
This procedure applies to all TL- and DTL-series Mamiya cameras.
|
