Return
Home
Return to
Main
How-To
Page

Photo Books
On Sale!
If you would like to
make a donation to
help fund this site,
click below!
|
Changing the NC1000s Focus Screen
The Mamiya NC1000s was essentially the same camera
as the NC1000. Outwardly, there was the relatively minor addition
of a film information memo pocket on the rear door (see picture above).
Changing the Mamiya NC1000s Focusing Screen
However, five interchangeable focusing screens (including the standard
screen which came with the camera) were available for the NC1000s
to satisfy the preferences or requirements of the photographer.
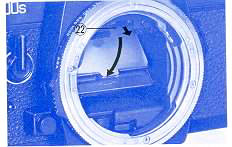
Removing the Focusing Screen
After removing the lens, gently pull the Focusing
Screen Frame Latch (22) slightly forward and both the Focusing Screen
Frame and screen will drop downward, making the screen easily accessible.
Caution:
When removing the screen, grasp it by its central
tab.
- Do not touch the surface of the screen as fingerprints are difficult to remove.
- When interchanging screens, handle them only by their edges.
- The Focusing Screens are susceptible to scratches, therefore, handle them
with extreme care.
- Be careful not to touch the mirror when interchanging screens.
Replacing the Focusing Screen
To insert a new screen, hold the screen by its central tab -- glossy-side
down and matte-side up -- and gently insert it into the lowered Focusing
Screen Frame. Carefully raise the frame upward, pushing it until it
locks in place with a click.
Do not try to insert the screen into the Focusing
Screen Frame upside down (glossy side up) as it will not fit properly.
- If the screen is not correctly seated completely in the frame,
it will not be possible to lock the frame shut.
- Be sure the Focusing Screen Frame is securely locked in place before
attaching a lens to the camera.
Available NC1000s Focusing Screens
While all of these were manufactured for the NC1000s, finding them
today can be a difficult task. These are the focusing screens that
were available:

No.1 Rangefinder Spot 45�/Microprism (supplied with camera).
The standard and highly versatile screen which offers three-was focusing
for excellent focusing accuracy. A central split-image rangefinder
spot has a diagonal wedge (45�) which makes precise focusing possible
with either horizontal or vertical lines. A microprism collar surrounds
the rangefinder spot, serving as a useful focusing aid with any subject.
The remainder of the screen is all matte and has a Fresnel lens for
corner-to-corner brightness.
No. 2 Rangefinder Spot. All matte with Fresnel lens and central
rangefinder spot. It helps achieve accurate focus even with wide-angle
lenses, which are usually more difficult to focus because of their extreme
depth-of-field. It is also suitable for general purpose photography.
No. 3 Microprism. Entirely matte with a Fresnel lens and a central
microprism spot. This is the usual focusing screen for general purpose
photography for those who find a rangefinder spot distracting. The
microprism assures rapid and accurate focusing and the matte surface
makes the entire screen suitable for focusing.
No. 4 Matte. All matte with Fresnel lens. Excellent for
close-up photography, checking the depth-of-field, and for use with
lenses of relatively slow maximum aperture (f/3.5 or smaller). Because
focusing aids such as microprisms and rangefinders become dark when
used under conditions described above they may prove distracting.
The No. 4 focusing screen is designed to minimize this problem.
No. 5 Cross-Hair. Clear transparent screen with Fresnel lens
and a cross-hair at the central spot. This screen does not give you
a proper meter reading. It is for use in special purpose photography,
as when working with the Auto Bellows or for astro-photography.
While focusing, the eye is moved to-and-fro (right-to-left), and when
the image no longer moves in relation to the cross hairs, optimum
focus has been achieved.
It is by no means complete, but the items I am working on so far are
listed below (note: the line items in blue are live page links; those
items in black are still under construction):
If you would like a specific repair or instructional
item to be considered on this site, simply go to my Mamiya
35mm Forum! and make your suggestion known. I will add
it to the list of things to do. However, please don't hold your breath,
because it is likely to be some time before I can get around to documenting
all the things that might need explanations, and I would hate to be
responsible for even small portions of the camera-collecting population
turning blue! Also, because mechanical and technical skills vary widely
from person to person, no liability for results or damage is either
expressed or implied in the use of these notations. |
| © 2000-2009 R.L.
Herron All Rights Reserved. Legal
|
| |
|
